Exact Door Size
No need to remove the door — just measure:
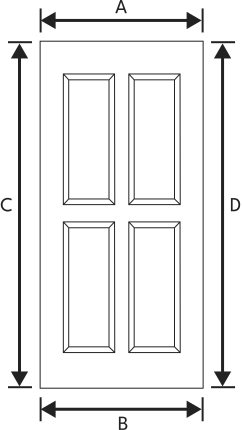
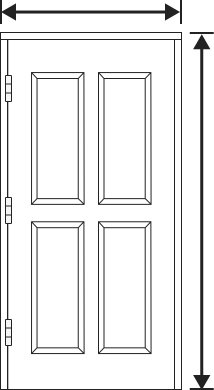
1. Width: Measure edge to edge across the door face.
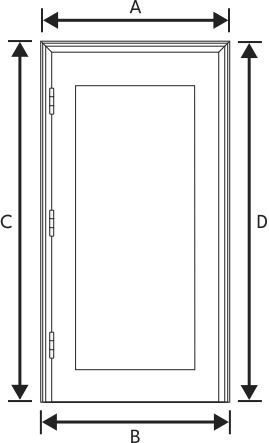
When measuring an existing door: take measurements at the top (A) and the bottom (B) of the door. If they differ, use the LARGER measurement for your door width.
We use the larger measurement so the new door is not made too small. A door can be trimmed or fitted slightly during installation, but material cannot be added back once the door is built.
2. Height: Top edge to bottom edge
When measuring an existing door, take measurements at the left (C) and right (D) sides of the door. If they differ, use the LARGER measurement for your door height.
Using the larger measurement gives enough material for final fitting if the existing door is slightly uneven or out of square.
3. Thickness: Door edge where the latch is
Record as: Width × Height × Thickness
Example: 32" × 80" × 1¾"
We’ll build the new door to match these exact dimensions.
If your existing door rubs or sticks: Skip this method and measure the finished opening instead.
Finished Opening
You’re measuring the clear space inside the frame, where the door actually moves.
This method is right if:
-
You’re keeping your frame
-
Your current door doesn’t fit well
-
You have a framed opening from a renovation
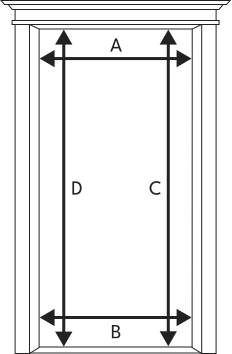
Measure only the inner wooden frame, not the casing or trim. You’ll take four measurements:
1. Width: Inside left jamb to inside right jamb.
Measure at the top (A) and bottom (B) of the opening. If they differ, use the LARGER measurement for your opening width.
We use the larger measurement so the new door is not made too small. A door can be trimmed or fitted slightly during installation, but material cannot be added back once the door is built.
2. Height: Inside top jamb to the floor or sill.
Measure at the left (C) and right (D) sides of the opening. If they differ, use the LARGER measurement for your opening height.
Using the larger measurement gives enough material for final fitting if the opening is slightly uneven or out of square.
Record as: Width × Height
Example: 32⅞" × 80¼"
We’ll size your new door slightly under these numbers for a clean field fit.
Rough Opening
A rough opening is simply the unfinished space framed by studs.
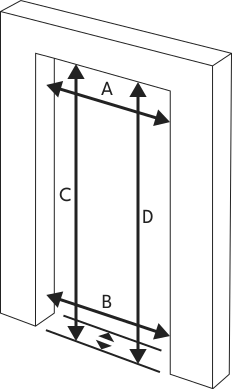
1. Width: Stud to Stud
Measure at the top (A) and bottom (B) of the opening. If they differ, use the SMALLER measurement for your opening width.
2. Height: Subfloor to underside of header
Measure at the left (C) and right (D) sides of the opening. If they differ, use the SMALLER measurement for your opening height.
3. Depth: Measure the wall thickness to confirm jamb depth. Make sure to include or factor in the finished wall material.
Record as: Width × Height × Depth
Example: 34½" × 82" × 8⅝"
If you see bare studs, you’re in the right place.
If you see painted or stained trim, use the finished opening method instead.
Pre-Hung Door on a Jamb
If you know the exact measurements of the full door jamb unit you want to order, use this option to provide those measurements.
1. Width: the width of the jamb unit, from the outside left side of the jamb to the outside right side of the jamb.
2. Height: the full height of the jamb unit, from the top edge of the jamb to the bottom edge of the jamb.
3. Depth: the depth of the jamb unit.
Pre-Hung on Brick Molding
1. Width: Measure inside the exterior door molding.
Measure at the top (A) and bottom (B) of the opening. If they differ, use the LARGER measurement for your opening width.
We use the larger measurement so the new door is not made too small. A door can be trimmed or fitted slightly during installation, but material cannot be added back once the door is built.
2. Height: Measure inside top molding to floor or sill
Measure the left (C) and right (D) sides of the opening. If they differ, use the LARGER measurement for your opening height.
Using the larger measurement gives enough material for final fitting if the opening is slightly uneven or out of square.
3. Thickness: Measure the door thickness. In this setup, the molding thickness will match the door thickness. Existing molding can be used if it matches your new door thickness.
Record as: Width × Height × Depth
Example: 34½" × 82" × 1 ⅛ "
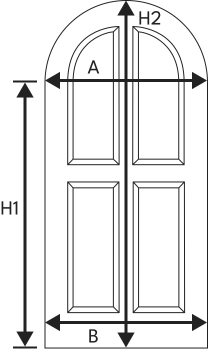
Arch or Round Top Door
No need to remove the door — just measure:
1. Width: Measure edge to edge across the door face.
Measure right before the arch starts (A) and at the bottom (B) of the door. If they differ, use the LARGER measurement for your door width.
We use the larger measurement so the new door is not made too small. A door can be trimmed or fitted slightly during installation, but material cannot be added back once the door is built.
2. Shoulder Height: Measure along the side from the bottom of the door to where the arch starts (H1).
3. Overall height: Measure from the bottom center of the door to the peak of the arch (H2).
4. Thickness: Door edge where the latch is
Note: Vintage Doors will require a traced template to make your door if it is not a true round top. How to Make a Template for an Irregular Round Top Door Opening
Record as: Width × H1 x H2 × Thickness
Example: 32" × 64” x 80" × 1¾"